
This tutorial will walk you through the process of adding products to your SnapSite store using WooCommerce. We will cover the addition of both simple products, as well as variable products which are items such as T-Shirs that have a selectable options such as size and color. These are the 2 main product types that are used. We will create separate guides for additoinal product types. Your SnapSite store has come with a sample simple and variable product pre-configured that you can always reference if you get stuck.
Adding Product Categories
If your products are going to have separate categories, please start by adding your categories into your SnapSite system.
1. Click the icon for “eCommerce Categories” from your SnapSite Dashboard

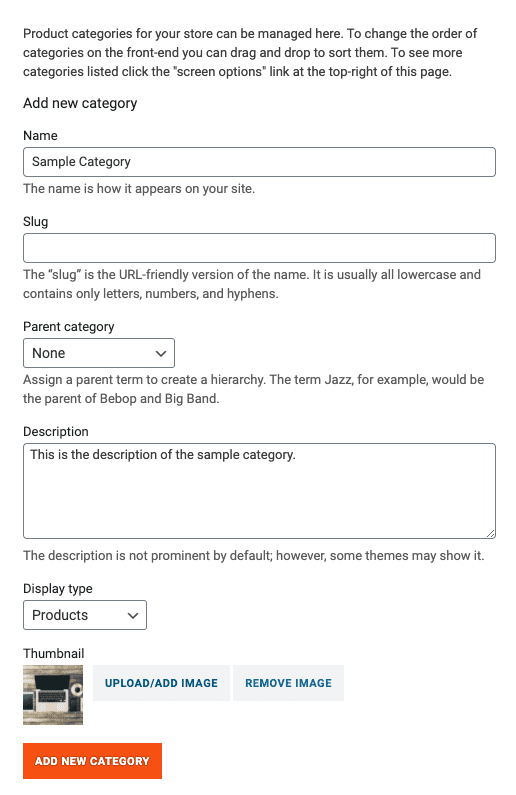
2. Enter the name of your category
3. Leave the “Slug” field blank as this will be automatically populated by the system. If you have a specific URL you would like to use for this category rather than having it auto generated based on the name, you can enter that here.
4. Select if this new category has a parent category that it is contained in.
5. Enter your category description.
6. Select your display type. Will this category show sub categories, products, or both?
7. Upload the thumbnail image for your category. For the best results, please use an image that is square and at least 250px x 250px
8. Click “Add New Category”
You will repeat these steps for all the product categories you wish to add into your system. You can always edit, delete, and create new categories in the future if needed.
Adding Products
Now that you’ve aded your product categories, you can proceed to adding your products to your store. This guide walks you through manually adding products to your SnapSite WooCommerce system. Detailed steps to adding products through our Printful Dropshipping integration will be in another post.
1. From your SnapSite Dashboard, click the icon for “eCommerce Products”

2. Click the “Add New” button
3. Start by entering your product name and your product description at the top of the page.
4. Next, scroll down to the PRODUCT INFORMATION section and select the type of product you will be adding.
– Simple Product – Single product with no selectable options
– Grouped Product – Product consisting of multiple simple products with option selection.
– External Product – Product that is not sold directly from your store, but from an affiliate partner link
– Variable Product – Product with selectable options such as size and color
Simple Product Setup
1. Select whether or not your simple product is virtual or downloadable. Virtual products are items that do not require shipping such as services or fees. Downloadable products are products that do not require shipping, but have a downloadable element that is being purchased such as a document, image, etc.
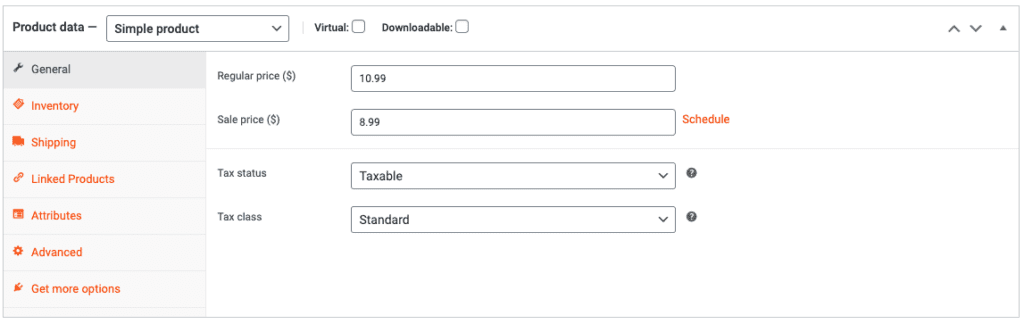
2. General Tab – In the general tab, enter your product price, sale price, tax status, and tax class. You can also schedule your sale pricing with a start and end date.
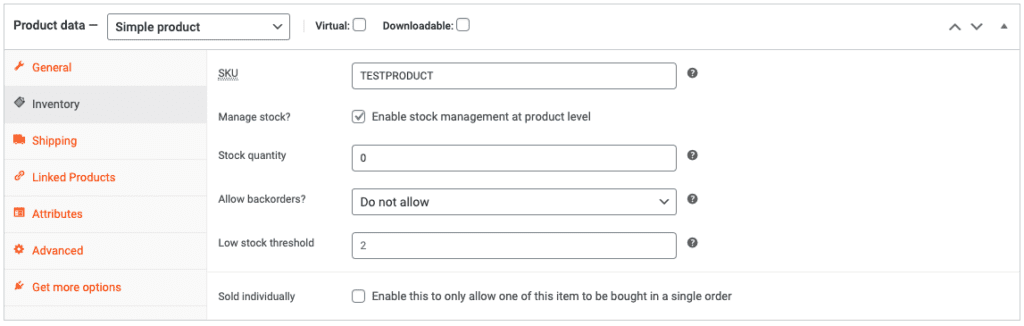
3. Inventory TabIn the inventory tab, enter your product SKU, whether or not you will be managing inventory levels, quantity on hand, stock status, whether or not backorders are allowed, your low stock notification threshold, and whether or not to allow multiple quantities of this item to be purchased per order.
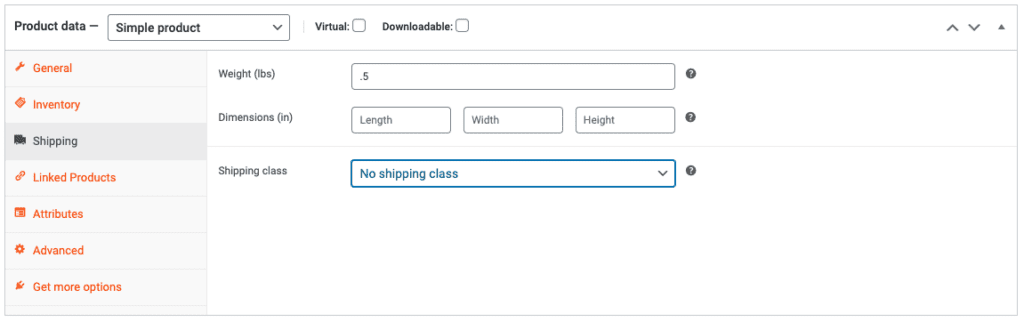
4. Shipping Tab -SnapSite only offers flat rate shipping at the time of writing this, so this tab is not as important, but we are looking into adding carrier rates, so in order to save time in the future, it is best to complete this section by entering your product shipping options.
5. Linked Products Tab – Here you will manually define any upsell or cross sell products to be associated with this product listing. Leave blank if you would like the system to automatically populate this data based on order history.
6. Attributes tab – Here, you can set custom product options that you would like to display on the product detail page. This can be additional specifications about the product you are selling such as dimensions, weight, etc. This tab will also be used when creating variable products to define the selectable options. More information on that can be found in the Variable Product setup instrucions below.
7. Advanced Options – On this tab, you can add purchase notes which will be sent to the customer after they purchase this item, set a custom display order for the product in your category listing, and decide whether or not to enable reviews for this product.
8. Size Chart – If you are selling items that require a size chart, you can upload the text or size chart image here. For best practices, it is reccomended you use an image to maintain mobile responsiveness of your product page.
9. Product Short Description – This is the description that will appear on the top of your product page to the right of your product image. This is just a short brief description of your product. The full details are entered in the primary description tab at the top of the page and will be displayed below the main product information.
10. Right Navigation – In the right navigation bar, you will set the category your product is in, product tags, product image, and any additional gallery images associated with your product.
Once all your product information has been entered, you can click “Publish” located at the top of the right navigation menu. That’s it! Now your product will appear on your SHOP page, or specific category page depending on how you have configured your SnapSite shop.
Variable Product Setup
Variable products are items that have selectable options such as a size and color. An example of this type of product be T-shirts.
1. To set up your variable product, you would begin by following steps 1-5 from the simple product setup instructions above. These steps are identical in both cases. Once you have completed those steps, you can move on to the guide below.
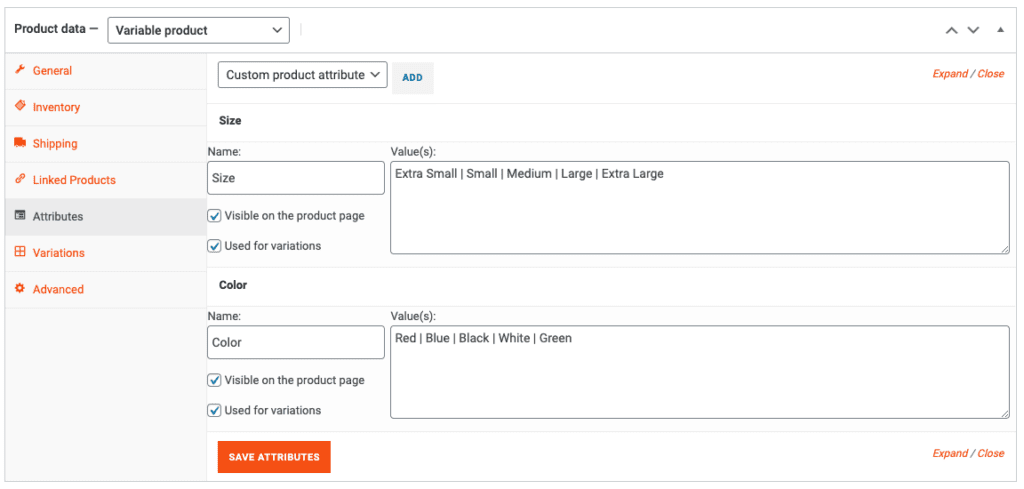
2. Attributes Tab – Here, you will be setting the selectable options for your product. To do so, click “Add” at the top of this section and add your attribute name. Once your attribute name is added, you will be able to add the values for that attribute. Each value needs to be separated by a pipe “|” character. In the example below, we have added the attributes size and color with their appropriate values. Once you are done, click “SAVE ATTRIBUTES”
*Make sure to select the attributes that will be used for variations. This identifies to the system that these options will be selectable options on the product detail page of your shop.
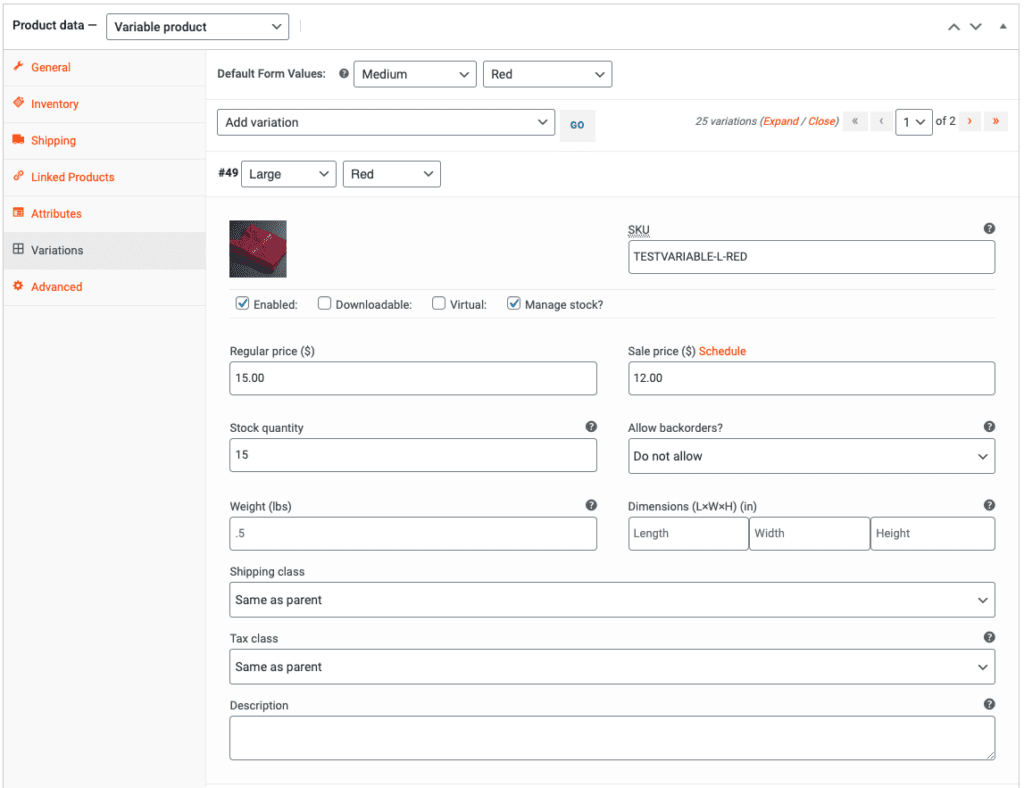
3. Variations Tab – This tab is the most important part of the variable product setup. This is where you add the additional sellable products that are associated with each selectable option. In order to automatically add all possible combinations, select “Create variations from all attributes” and then select “GO”
*You will receive popup messages confirming this action. Click YES for both notifications to proceed. Depending on the amount of options available, you could have over 100 different possible variations. This is normal behavior.

4. Now that your variations have been added, you need to manually add the information for each of the available options. To add things like SKU, image, pricing, etc. click on the variation number on the left to expand the variation. Fill in all available information here and then repeat for every single variation available for this product. This can be time consuming, but it is important to complete this information so the system will function correctly and so that customers can purchase your products. You can have different pricing, weights, and descriptions for each variation. You can also manage the stock separately for each variation.
*If you would like the product image to change based on the customer selection on the front end of your shop, it is important to upload an image for each separate variation. For example, a red shirt for every variation with RED, a blue shirt for every variation with BLUE. If you leave these blank, only your default product image will show up no matter what option the customer selects.
**It is important to make sure you enter a unique SKU for each product variation. This helps the system identify which specific variation is being purchased. It also helps with administrative reporting and order fulfillment. Best practice for this is to use the MAIN SKU followed by attribute selection. For example, if your main SKU is TSHIRT, your variation sku would be TSHIRT-S-R for a small red t-shirt.
5. You can follow steps 8-10 of the Simple Product guide above to complete the product setup for your variable product. This includes adding the product to a category, setting the default product image, and adding product tags. Once you are done, click the “Publish” button in the top right of the right navigation bar.
Thats it! Your product is now published! You will repeat these steps for each product you need to add to your SnapSite store. If you ever run into any issues while setting up your product, please open a support ticket by clicking the support icon from your SnapSite dashboard and our team will be happy to assist.
Please note, our support team can not create your products in the SnapSite system for you. They can only assist with any issues that may arrise. It is the customer’s responsibility to add their products to their own shop.
